

[Advertisement]

The mycusini 3D chocolate printer conjures up true works of art.
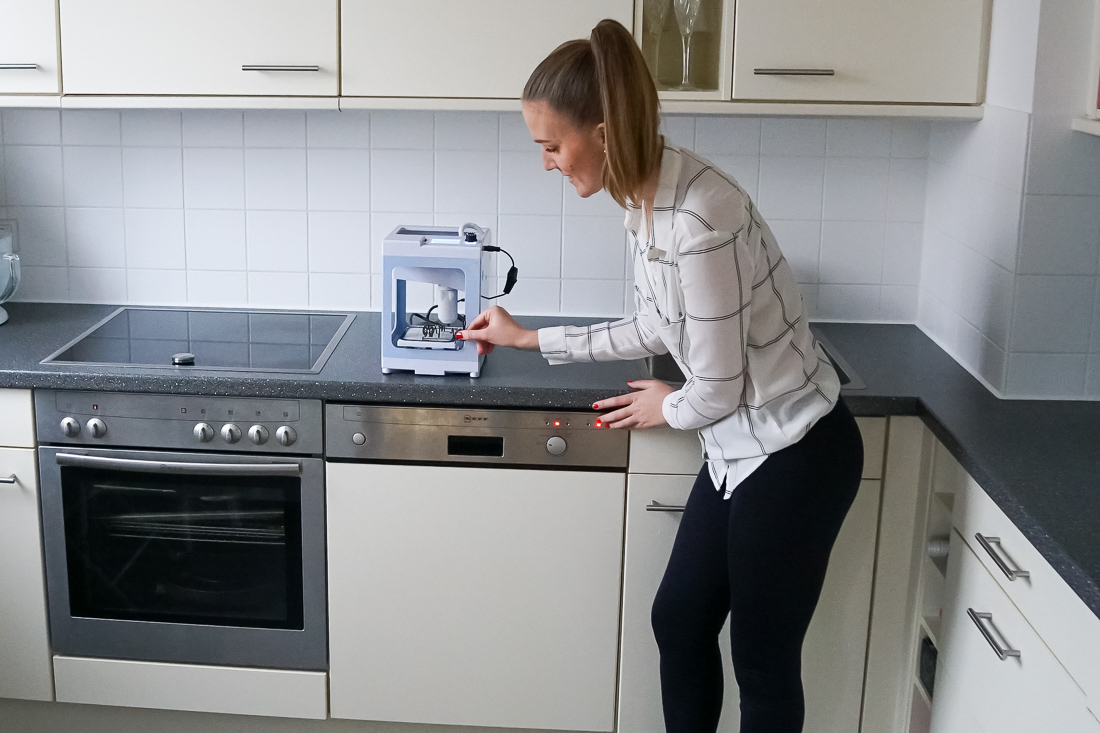
Finally! The 3D chocolate printer for home use: mycusini – „"Printers are boring, the ink runs out too quickly, and they're always breaking down!" Who hasn't heard these complaints? But that's all over now, and your supposed worst enemy can quickly become your best "kitchen friend." If you're thinking, "Wait, since when has Bianca been writing about printers?", you're absolutely right. But wait! This is about a completely paperless and ink-free printer. You'll love it, the unique 3D chocolate printer for home use: mycusini. Yes, that's right! Chocolate to print, in 3D with numerous pre-installed templates, easy to use, and tons of fun. I got to try out this handy 3D printer at home, and when I'm not at my computer, I'm practically always in the kitchen printing chocolate. Let's get started!

#love – almost too beautiful to eat.
mycusini 3D chocolate printer – The printer for home use
Do you know that feeling when you hear about something that, try as you might, is beyond your wildest imagination? – That's how I felt when I first heard about the mycusini 3D chocolate printer. A thousand questions raced through my mind: "How can you even print chocolate?", "What do you have to keep in mind when printing with chocolate?", "How does it all work without the pieces sticking together?", and "Can a 'layman' use the printer?". I admit, I was a bit skeptical at first and wanted to know if the printer really lived up to its promises. Now, after numerous prints and answers to my questions, I know more and have become a huge mycusini fan.
The mycusini 3D chocolate printer, roughly the size of a small espresso machine, is a real joy to use in the kitchen. Weighing just 2.8 kg, it's easy to move and reposition, making it suitable even for small kitchens. You can start printing right after unpacking it and once you've familiarized yourself with the user-friendly software built into the printer.
The printer comes with five packets of chocolate, a power adapter with a switch, a small silicone mat, tweezers and a safety pin, a template for cutting the chocolate bars in half, a stainless steel cartridge, an instruction manual, a template sheet, a USB cable, and a USB flash drive. It sounds like a lot, but these are mostly helpful accessories and gadgets to make operation even simpler. Most importantly, besides the printer itself: the chocolate! It comes individually wrapped in five slim, approximately 10 cm long chocolate bars – see photo – and can be reordered in packs of five (32 grams each / 160 grams per pack) from the online shop (for €7.85). Depending on the size, you can get about four to five chocolates from one chocolate bar, meaning one packet yields approximately 25 chocolates for around €8 – a fair deal. Each time you use it, the chocolate bar must be cut in half (using the halving template) and placed in the stainless steel cartridge. After warming up, the fun can begin.

These are the chocolate bars, which are cut in half (using a template) and placed in the cartridge.
Print with mycusini
The mycusini printer features a small display on top that guides you easily and reliably through the entire process. A clearly written instruction sheet is also included. Once you start the printer, you'll be guided through each step in a straightforward and understandable way, from filling the cartridge and attaching the small print arm to selecting your object, starting the print job, and the subsequent cleaning process. The display shows both the selection of your desired shape – lettering, letters, symbols, skylines, animals, and much more – as well as the percentage progress of the current print. Also important: you can always see how much chocolate is left in your cartridge during printing, allowing you to better plan your prints in terms of chocolate quantity. The included tweezers are for removing the empty chocolate shell from the stainless steel cartridge. Should the stainless steel cartridge become clogged, you can use the small pin to clear it – this wasn't necessary for me even after about 25 prints. You can print continuously until the integrated chocolate cartridge is used up. Afterwards, the printer will restart its 10-minute warm-up process once you've inserted a new chocolate cartridge. There are no limits to your imagination, and you can even create personalized shapes and fonts online – more on that in a moment. A single print takes between 5 and 15 minutes, depending on the number of layers in your object and the shape and height being printed.
I naturally took a close look at the chocolate, a cocoa-based fat coating. It tastes like a mild dark chocolate and is currently only available in one variety – but that's about to change. Besides sugar, it contains hydrogenated vegetable fats (coconut, palm kernel), cocoa powder, and vanilla extract. It's important to store the chocolate in a dry place, away from heat and light. Once you receive the chocolate – either with the printer or in a refillable version – you should use it within six months. Personally, I find it delicious.
Here's how I tried my first 3D print:

This is what it looks like in the mycusini club when you design your own logo.

Doesn't that make starting the day so much sweeter?
The mycusini club for even more fun
The mycusini-Club This is a bonus from the developer. After a simple online registration, you can log into the club and choose between "Applications" and "Print Templates." If you want to design your own templates, click on "Applications" and you can create lettering, text messages, freehand drawings, contours, outlines, 3D objects, and hollow shapes. It's really fun, and you don't need any technical know-how because you're guided step-by-step through the simple design process. This allows you to create names, terms, greetings, and more. You also choose the number of chocolate layers your object should have in your templates. This determines the height of the printed praline.
The "Template Library" category is currently divided into 12 subcategories (Christmas, Countries and Cities, Love, Easter, Miscellaneous, Sports, Animals, Lettering, Letters, Numbers, Halloween, and Games). There you'll find all the templates that are also available on the printer and can be selected even without a club membership. The categories are constantly being expanded and updated. The "Freehand Drawing" option and the "Tracing Outlines" feature of an inserted image are also fun. You trace the outlines of your photo on the screen, and your artwork is printed. Just try it out for yourself! Once you've created a template that you want to print, it's incredibly easy. The included USB stick or adapter is for this purpose. Simply copy the file to the printer's integrated SD card, and you'll find the file in the template list. Cool, right?

Have you ever seen such a beautiful "chocolate Munich"?
My tips for successful application
Since I've spent a lot of time with the printer, I'd like to share some tips for getting the most out of your 3D chocolate printer. When you turn the printer on, I recommend inserting the chocolate immediately, as the 10-minute warm-up phase will begin afterward. The remaining time will be displayed on the screen, and a short signal will sound once the chocolate has reached the correct temperature for printing.
I would also recommend starting with a flat, simple shape. While the printing result doesn't depend on your skill, it's more fun to watch, especially the first time, as something like a letter, the Munich skyline, or the word "Love" takes shape, and you can admire your result more quickly. Be sure to let your chocolate artwork dry a little before removing it from the small rubber tray, and only handle the molds with cool hands.
For even more fun, I highly recommend joining the mycusini club described above and creating your own templates. There you'll find countless additional ways to enjoy your mycusini 3D chocolate printer. Once you have a little experience, you can even let the printer print unattended. Just make sure there's enough chocolate in the cartridge (you'll be asked before each print if you want to change the cartridge) and that there are no obstructions (dust, small objects, etc.) near the printer. The printer makes similar noises to a paper printer, but it's not disruptive if you want to have a conversation while it's printing. I also recommend cleaning the printer after every use. The display will guide you through the process.

My name in chocolate – too beautiful to eat.
I also recommend leaving the cartridge with the opened chocolate bars in the printer – not in the refrigerator. I initially stored the stainless steel cartridge and chocolate in the refrigerator, and despite subsequent heating via the mycusini printer, the chocolate created unsightly holes during printing. So it's best to use up the chocolate immediately – at least that's how I got the best results.

Quick and easy to clean.
Hard facts and personal opinion
What might initially seem skeptical quickly turns into a real joy! Once you understand the mycusini 3D chocolate printer, it's incredibly easy to use. I only spent about 20 minutes familiarizing myself with the instructions, the controls, and the integrated software, and I had it figured out in no time. During my first attempts, I actually spent hours in the kitchen, losing track of time and searching for templates. That's how I created 3D animals, pictures, and figures. I kept refilling the cartridge with new chocolate and experimenting with the templates and my own lettering. You absolutely don't need to worry that you have to be a techie or a kitchen whiz to use this printer.
The fair price of €298 is also absolutely reasonable and, in my opinion, within a range that's perfectly acceptable. I can hardly imagine a better gift for one of your loved ones. If you have a sweet tooth and are open to new things, I highly recommend it. It's so much fun to decorate desserts, tarts, and cakes with the mycusini prints. Once you're a proud mycusini owner, you can also... mycusini Facebook group Sign up – there you'll find even more tips and tricks for chocolate printing and also some amazing creations to admire. Thumbs up for this great development.
+++ This article was created in cooperation with mycusini. Thank you! +++
3D chocolate printer mycusini
Website
Details: 3D chocolate printer for home use;
298 euros; numerous print templates; design your own templates;
Chocolate included in a 5-pack and available for reorder (7.85 euros)
Become a Facebook fan and don't miss a thing!
Do you also want a mycusini? – You can shop here!
Pictures:

-

- #love – almost too beautiful to eat.


-

- Quick and easy to clean.
-

- These are the chocolate bars, which are cut in half (using a template) and placed in the cartridge.
-

- Have you ever seen such a beautiful "chocolate Munich"?


-

- Doesn't that make starting the day so much sweeter?
-

- This is what it looks like in the Mycusini Club when you design your own lettering.





Angelika Sondermann
Wow…such a great printer…it would be a dream come true for me as a hobby baker 🎂 😍 and my family ❤ would be thrilled…because everyone here loves chocolate. 🍫 Thank you for your wonderful, informative report and the great pictures. Now I can finally imagine it better. 👍